
Tutorial - Dynamic Mail Communicator™
This tutorial will walk you step by step on how to keep use
Email Tracking System / Service to track performance of your
Email Campaigns
There are 3 Steps:
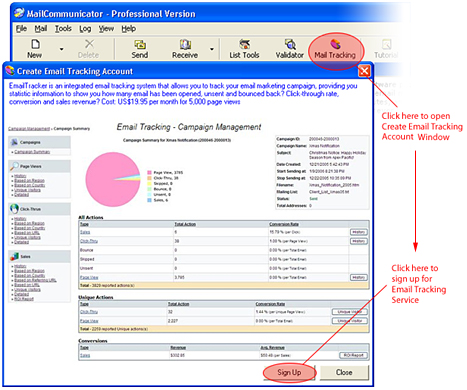
1. Sign Up for Email Tracking Account: In order to have this function running, you need to be sign up with our Email Tracking Service. Please click on the "Mail Tracking" button to pop up the Create Email Tracking Account Window as shown below, click Sign Up and then enter your details. Your copy of Dynamic Mail Communicator comes with 30 days Trial Period of Email Tracking Service subscription.
2. Adding Tracking to the Email Message :
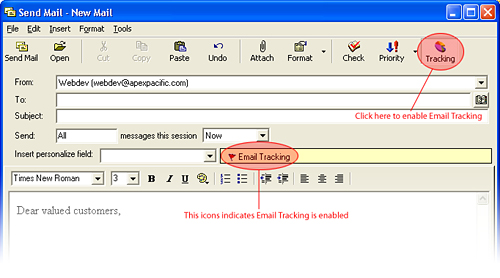
Once you have created Email Tracking Account, create your email
message as you normally would, and then click "Tracking"
button on the toolbar to enable Email Tracking, an Icon will
pop up indicating that Email Tracking has been turned on. Note:
You must use HTML format to use Email Tracking. Email Tracking
does not work with plain text messages.
3. Viewing your Report: After
you have sent your Email Campaigns, you may view Email Tracking
Statistics report by clicking the "Mail Tracking"
button as shown below.
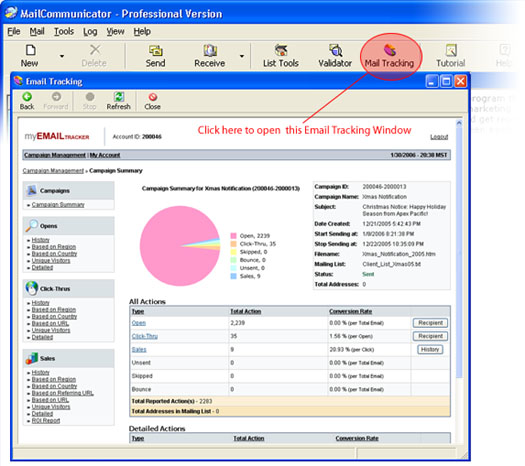
In the Email Tracking Report you may:
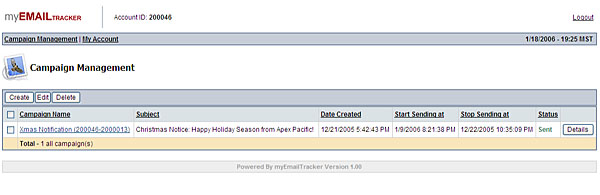
1. Manage your Campaigns - Create, Edit or even delete your Campaign information as shown below.
2. Viewing the Stats - Get a comprehensive report on your Email Campaigns performance, such as:
- Open - Know how many recipient opens your email message.
- Click Thru - Know how many recipient click the link on your email message to your website
- Sales - Know how many recipient finally
make the purchase originated from your email message
(In order to do this you need to insert a tracking code into your order confirmation page , please click to "My Account" / "ROI Tracking" in the system to find out more.) - Bounce Back - Know how many "no good" email address in your list and got bounced back from the server
There are also few reports types such as:
- View by History - Display the progress of your campaign over time.
- View based on Region & Country - Know more where you getting conversion from and aim your campaign to certain demographic area.
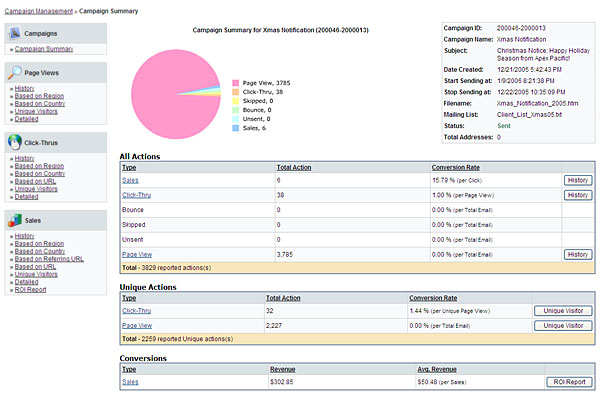
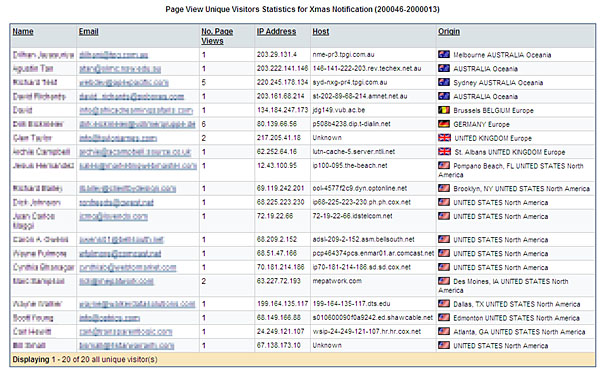
- Drill down to a complete detail - Comprehensive report on which particular recipient performing which action on which date.
3. Change your Details - Click on the "My Account" link at the top of the screen, this screen will enable you to change your details such as Name, Address, Credit card information.
4. ROI Tracking - Click on the "My Account" link at the top of the screen, and then click "ROI Tracking", this screen contains information on how to setup tracking code in your order confirmation page that will enable you to track sales of your campaigns.
5. Billing Summary - Click on the "My Account" link at the top of the screen, and then click "Billing Summary" to display the history of your billing.