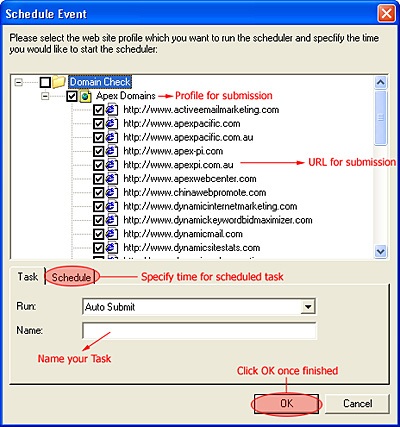
- Step 2
 
4. Check the web site profiles and URLs from the list, scheduler will only run the submission for those checked items.
5. Enter the name of your schedule event task in the “name” field (You may enter the company name if you provide submission service for different companies).
6. Go to “Schedule” tab, to specify the starting date of your submission.
7. Check the box to select the frequency of your submission: monthly, fortnightly, quarterly or even weekly. For weekly period you need to specify the day of your submission.
8. Click “OK” to add your new schedule task to the scheduler list.
9. You can modify the selected task details by clicking “Edit” button in the “scheduler” tool bar.
10. To remove a task, select the task from the list and then click “delete" button in the tool bar.
11. Click “View Log” to view your schedule details.
12. Click “Run Now” button in the tool bar to straight away execute the selected task
13. Click “Close” to exit and close the scheduler.

Important things to know about scheduler.

1. You have to leave the computer running and have Dynamic Submission scheduler up and running at the time of scheduled submission.
2. You have to have access to internet at the time of submission, Dynamic Submission scheduler can not create internet connection by itself.
3. You can not have Dynamic Submission software main program running at time of scheduled submission, the scheduler is programmed not to carry out submission if the main program is running at that time.

  Previous previous
  next Next  
Initial Setup
Web Profile
Web Optimization
Web Submission
Monitoring results
Registration